Defining Tools
Tools are Python functions that an agent can call during a conversation to fetch or mutate live
application data. They are defined in your app's module code using the @tool decorator and
are discovered automatically when you sync them.
Creating a tools.py file
Create a tools.py file inside any module in your app's backend/ directory:
backend/
└── items/
    ├── models.py
    ├── views.py
    └── tools.py        ← define tools here
The @tool decorator
from zango.ai.tools.decorator import ToolParam, ToolSafety, tool


@tool(
    name="get_item_details",
    description="Fetches details of an item by its ID. Returns name, description, and quantity.",
    section="items",
    safety=ToolSafety.READ_ONLY,
    timeout_seconds=10,
)
def get_item_details(
    item_id: int = ToolParam(description="The database ID of the item"),
) -> dict:
    from .models import Item

    try:
        item = Item.objects.get(pk=item_id)
    except Item.DoesNotExist:
        return {"error": f"No item found with id {item_id}"}

    return {
        "id": item.id,
        "name": item.name,
        "description": item.description,
        "quantity": item.quantity,
    }
Decorator parameters
| Parameter | Type | Default | Description |
|---|---|---|---|
name | str | required | Unique tool name shown to the LLM and in the App Panel. |
description | str | required | Explains to the LLM what this tool does and when to use it. Write it clearly: the LLM decides whether to call the tool based on this text. |
section | str | "general" | Groups related tools together in the App Panel. |
safety | ToolSafety | READ_ONLY | READ_ONLY, WRITE, or EXTERNAL. See Safety levels. |
timeout_seconds | int | 30 | Maximum time allowed before the tool is aborted. |
rate_limit | int | None | None | Max calls per minute. None means unlimited. |
memory_policy | str | "include" | Whether this tool's call and result are replayed in session memory. See Memory policy. |
Tool parameters with ToolParam
Each function argument that the LLM can provide must use ToolParam as its default value:
def my_tool(
    patient_id: str = ToolParam(description="The UUID of the patient record"),
    include_history: bool = ToolParam(description="Whether to include past visits"),
) -> dict:
    ...
The description in ToolParam is sent to the LLM so it knows how to populate
each argument. Always write descriptions from the LLM's perspective: what is this value, and where does
it come from?
Safety levels
from zango.ai.tools.decorator import ToolSafety

ToolSafety.READ_ONLY   # Tool only reads data; cannot write, update, or delete
ToolSafety.WRITE       # Tool modifies data in the database
ToolSafety.EXTERNAL    # Tool calls an external service (email, SMS, third-party API)
| Level | When to use |
|---|---|
READ_ONLY | Any tool that only fetches or queries data |
WRITE | Tools that create, update, or delete records |
EXTERNAL | Tools that trigger side-effects outside the database (send email, call an API) |
Memory policy
When an agent has short-term memory enabled, every tool call and its result are saved to the
session history and replayed on the next agent.run() call. memory_policy
controls whether a specific tool participates in that replay.
| Value | Behaviour |
|---|---|
"include" (default) | The call and result are stored in session history and sent to the LLM on subsequent turns. |
"exclude" | The call and result are dropped from loaded history. Use for side-effect tools that should not be replayed (e.g. send email, send SMS). |
from zango.ai.tools.decorator import ToolParam, ToolSafety, tool

# This tool's execution will NOT appear in session history on the next turn
@tool(
    name="send_notification",
    description="Sends a push notification to the user. Call this once the response is ready.",
    safety=ToolSafety.EXTERNAL,
    memory_policy="exclude",   # don't replay; the notification was already sent
)
def send_notification(
    user_id: int = ToolParam(description="The user to notify"),
    message: str = ToolParam(description="The notification message body"),
) -> dict:
    ...
    return {"sent": True}
:::tip When to use memory_policy="exclude"
Use "exclude" for any tool that triggers an irreversible real-world action: sending an email, posting
an SMS, calling a payment API. Replaying those actions on the next turn would cause double-sends or
duplicate charges.
:::
Returning data from tools
Tools must return a dict. The LLM receives this dictionary as the tool result and uses it
to formulate its response.
# Good: structured, descriptive keys
return {
    "patient_name": "John Doe",
    "screening_date": "2024-03-15",
    "outcome": "Eligible",
}

# Good: error case
return {"error": "Patient not found with ID 123"}
Tenant context in tools
Tools run in the same tenant schema as the request or task that triggered the agent. You do not need to
set connection.set_tenant(); Zango handles it automatically.
# This ORM query automatically uses the correct tenant schema
item = Item.objects.get(pk=item_id)
Multiple tools in one file
A single tools.py can define as many tools as needed:
@tool(name="get_item_details", ...)
def get_item_details(item_id: int = ToolParam(...)) -> dict:
    ...

@tool(name="get_item_count", ...)
def get_item_count() -> dict:
    from .models import Item
    return {"total_items": Item.objects.count()}

@tool(name="update_item_quantity", safety=ToolSafety.WRITE, ...)
def update_item_quantity(
    item_id: int = ToolParam(description="The item ID"),
    quantity: int = ToolParam(description="The new quantity"),
) -> dict:
    from .models import Item
    Item.objects.filter(pk=item_id).update(quantity=quantity)
    return {"success": True, "new_quantity": quantity}
Discovery and sync
Tools become available to agents once they are synced: Zango scans every tools.py across
your modules, registers new tools, and updates changed ones (names, descriptions, parameters, safety).
The zango-app-developer plugin runs this sync through the platform API whenever it adds or
edits a tool, so you rarely trigger it by hand. After a sync, each tool carries live metadata, its
module path, return type, parameter schema, and usage counters (calls, errors, timeouts, average time),
and can be attached to any agent.
Tools are tenant-scoped. Syncing for one tenant does not affect another.
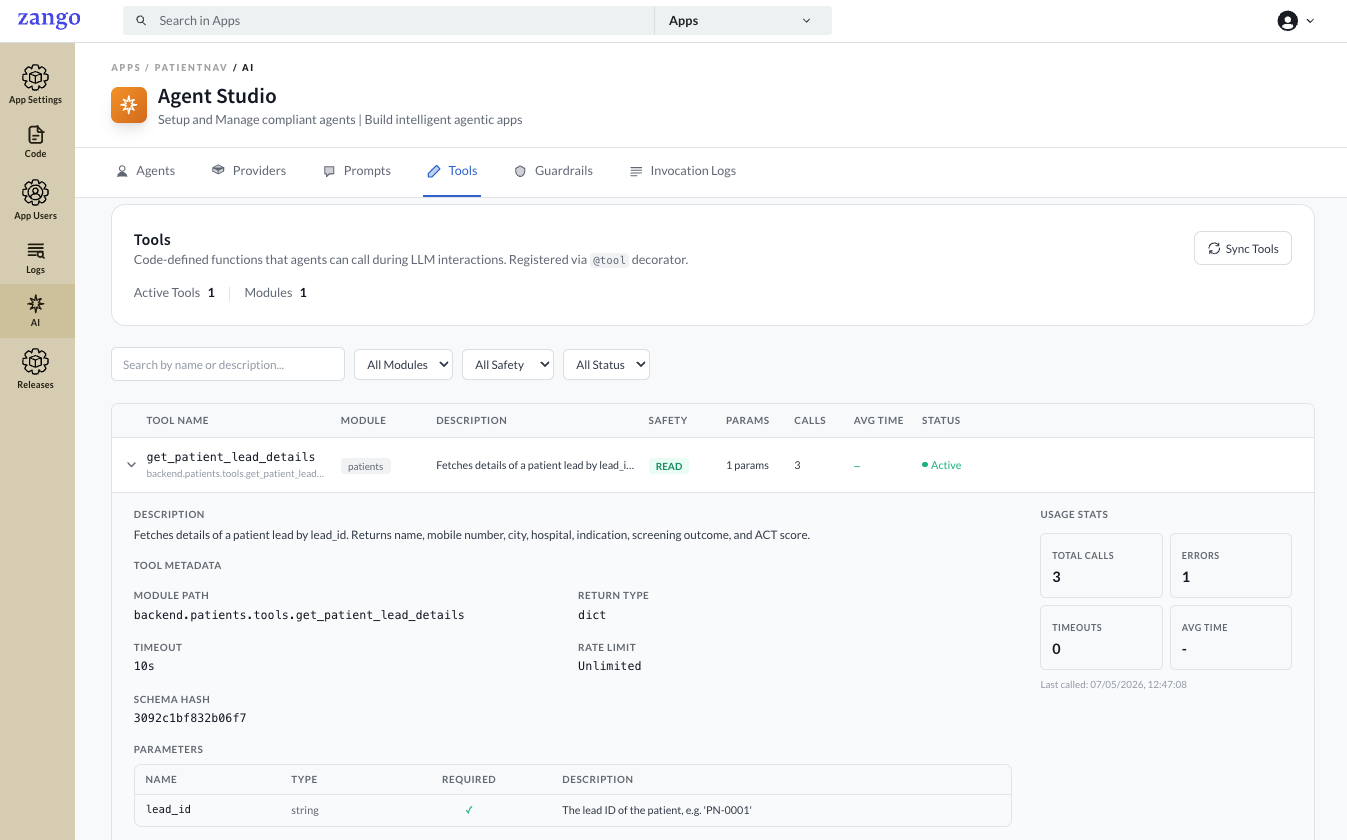
@tool appears with its section, safety level, parameters, and usage stats, ready to attach to an agent.Next steps
With tools defined and attached to an agent, run the agent from your code.